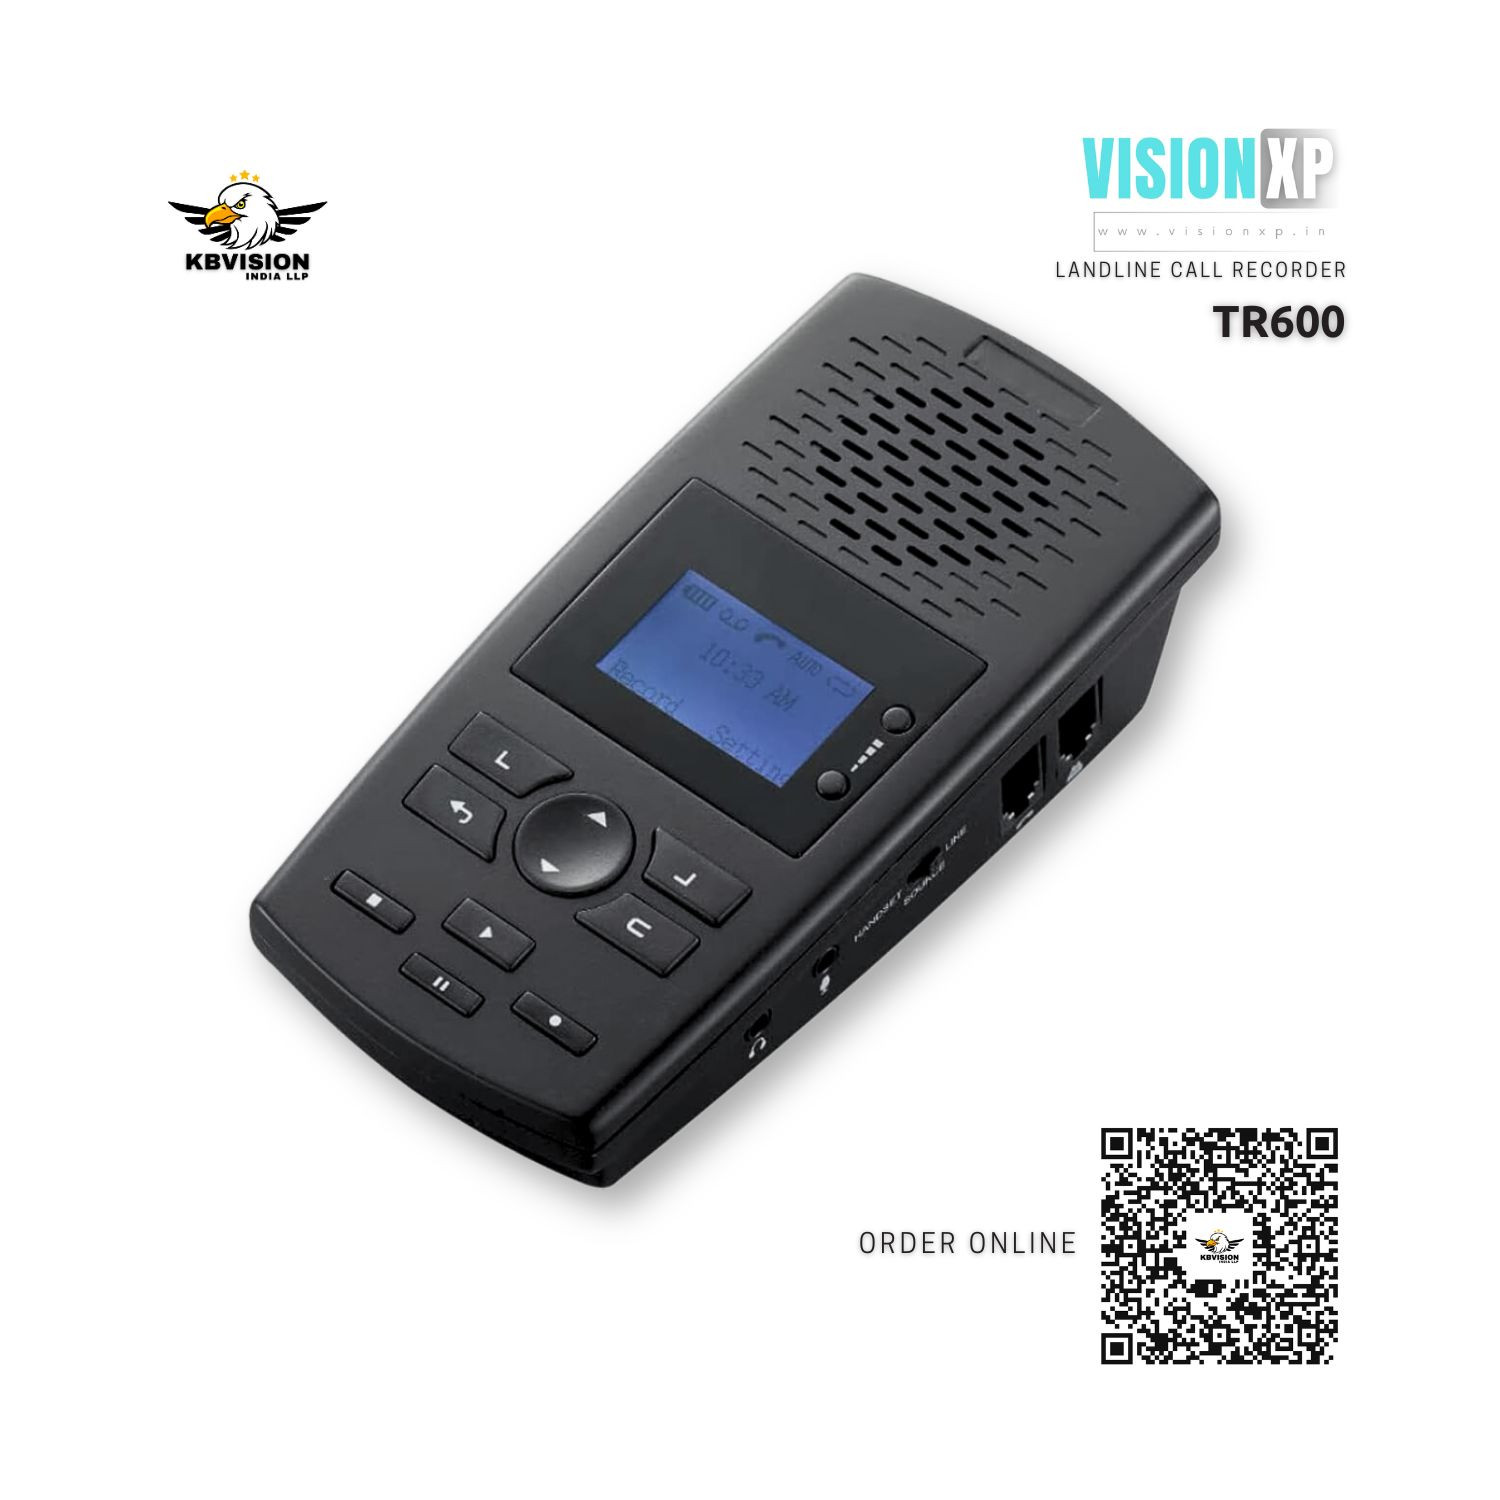
Standalone Landline Telephone Automatic Call Recorder - TR600 Lowest Price
Product Detail :
1 Insert SD Card
The purpose of the SD card is to store phone call recordings (supports up to a 32GB SD card). The TR600 will not work without an SD card, please make sure it is inserted before operating the TR600.
- Insert an SD card into the card slot on the side of the TR600 (a class 10 card is recommended).
- You will feel a click when the card has been inserted correctly.
- To remove the SD card, push the card in until you feel a spring release;
the SD card will be ejected when you let go.
NOTE - If no SD card is inserted, the TR600 will not power on; there will be a load beep and a SD card error.
2 Navigating The TR600
-
The diagram below outlines the TR600 buttons. You will use these buttons to perform various functions & navigate the menu.
NOTE - The Left/Right Select Keys correspond to menu items in the lower left/right of the screen menu. The Up/Down Button allows you to scroll up or down to different menu options. The Back Button will always take you back to the previous screen/menu
3 Record On Analog Phones
- To record on an analog phone you will need to put the TR600 in Line Mode. This section shows you how to put the TR600 in the proper mode and how to connect it to an analog phone. The diagram below shows you how to properly connect the TR600 to an analog line and then to your phone.
A. CONNECT THE TR600
- Connect the TR600 to the wall jack - Run the phone line from the wall jack to the line port on the back of the TR600
- Connect your phone to the TR600 - Run the phone line from the phone base to the Phone Port on the back of the TR600
B. ENTER LINE MODE
- Make sure the SD card is inserted & the AAA batteries are installed 2. Plug the TR600 into a wall outlet using the provided cord & adapter
- Make sure the source switch on the side of the TR600 is in the PHONE position.
- Enter the Settings menu (press right select key). 5. Select Recording Settings (press left select key). 6. Select Manu Rec. Mode and select Line Mode.
NOTE - The AAA batteries are used as a back up when the TR600 is not connected to a power source.
C. LINE MODE RECORDING SETTINGS
Once in Line Mode, the TR600 is ready to start recording calls. But
First, select your recording mode; either manual or voice activation mode.
Manual Recording Mode In this mode, you will initiate recording by pressing the record/stop button on the TR600. To turn this mode on, follow the steps below:
- Enter the Settings Menu and select Recording Settings.
- Select Auto / Manual Rec and select MANUAL
- To record a phone call, press the RECORD button on the TR600 to start recording
- To stop recording press the STOP button.
Auto Recording Mode - In this mode, the TR600 automatically begins recording when a call is made or received; it stops recording when the call is completed.
- Enter the Settings Menu and select Recording Settings. 2. Select Auto / Manual Rec and select AUTO
NOTE - TRIG (Trigger) mode also known as Voice Activation mode will not work in line mode. You can also change additional settings in Recording settings menu. (See section 6)
4 Record On Digital, IP, and Multi-line Phones
- This section outlines how to properly hook-up the TR600 to record on Digital, IP, and Multi-line Phones.
NOTE - The TR600 will need to be in Handset Mode. 8
In the diagram above, notice the connector size difference on the wall jack (the wall jack connector for the IP phone is a larger Ethernet cable type).
A. CONNECT THE TR600
- Connect wall jack to phone base - Run the phone line from the wall jack to your phone base.
- Connect phone base to the TR600 - Run the phone line from the phone base to the line handset port on the side of the TR600.
- Connect TR600 to the handset - Run the phone line from the phone line handset port on the side of the TR600 to the handset.
B. ENTER HANDSET MODE
- Make sure the SD card is inserted & AAA batteries are installed
- Plug the TR600 into a wall outlet using the provided cord & AC adapter 3. Make sure the source switch on the side of the TR600 is slid to the PHONE position.
- Press the right select key to enter settings
- Select Recording Settings.
- Enter Manu Rec. Mode and select Handset Mode.
NOTE - The AAA batteries are used as a back up if the TR600 loses power or is not connected to a wall power outlet
C. HANDSET MODE SETTINGS & OPERATION
- Once in Handset Mode, the TR600 is ready to start recording calls. But First, select your recording mode; either manual or voice activation mode.
NOTE - The auto recording mode (used in line mode) will not work in Handset Mode. To record calls automatically in handset mode you will need to turn on voice activation mode.
Manual Recording Mode : In this mode, you will initiate recording by pressing the record/stop button on the TR600. To turn this mode on, follow the steps below:
- Enter the Settings Menu and select Recording Settings.
- Select Auto / Manual Rec and select MANUAL
- To record a phone call, press RECORD button on the TR600 to start recording
- To stop recording press the STOP button.
Voice Activation Mode (automatically record) :
In this mode, the TR600 will begin recording when sound is detected on the phone line. Using this mode will allow your TR600 to record your calls automatically in Handset Mode.
- Enter the Settings Menu and select Recording Settings. 10
- Select Auto / Manual Rec and select TRIG Below are the settings you will need to adjust to maximize the use of your TR600’s Voice Activation Mode and are found in the Recording Settings.
Vox Trig Level : This is the threshold to detect audio when the handset is lifted to start recording. If it is set too sensitive, recording may start when background noise is present and the phone is not in use. If not sensitive enough, it will not reliably start recording when the phone is in use. Settings are 1 to 10 with 1 being the most sensitive and 10 the least sensitive. The default setting is 3.
Vox Silence : This setting monitors the duration of time the TR600 hears silence before ending the recording. If set too short, your recordings may be broken into several smaller recordings. If set too long, it may merge one recording into another to produce one recording from two calls. The default setting is 5 seconds and can be set anywhere from 2-99 seconds.
NOTE - In Handset mode Caller ID is not available.
5 MIC Mode
In this mode the TR600 can operate as an audio recorder for meetings, memos, or lectures.
A. MANUAL RECORDING
- Make sure the source switch on the side of the TR600 is in the MIC position.
- Enter the Settings Menu and select Recording Settings.
- Enter the MIC Rec. Mode and select MANUAL.
- Go to home screen and press the Record Button to begin recording
- Press the Stop Button to stop recording.
B. VOICE ACTIVATION RECORDING
- Make sure the source switch on the side of the TR600 is in the MIC position.
- Enter the Settings Menu and select Recording Settings.
- Enter into MIC Rec. Mode and select VOX.
- The TR600 will then start recording when sound is detected.
Below are the settings you will need to adjust to maximize the use of your TR600’s Voice Activation Mode and are found in the Recording Settings.
Vox Trig Level : This is the threshold to detect audio. If it is set too sensitive, recording may start when background noise is present. If not sensitive enough, it will not reliably start recording when you are wanting to record audio. Settings are 1 to 10 with 1 being the most sensitive and 10 the least sensitive. The default setting is 3.
Vox Silence : This setting monitors the duration of time the TR600 hears silence before ending the recording. If set too short, your recordings may be broken into several smaller recordings. If set too long, it may merge one recording into another to produce one. The default setting is 5 seconds and can be set anywhere from 2-99 seconds.
NOTE - Use the Microphone port to plug in an external microphone to improve the recording quality of your TR600.
6 Settings A. RECORDING
- MIC REC. Mode - Change between Manual & Vox (voice) activation for Mic Mode.
- Auto / Manual Rec - Change between Manual, Auto, and Trig mode.
- Manu Rec Mode - Change between Handset Mode and Line mode.
- Vox Trig Level - Adjust the level of voice sensitivity to trigger recordings. (Level 1 - 10)
- Vox Silence - Duration of silence needed to stop recording. (2 - 99 seconds)
- Max Rec. Duration - The maximum duration of one recording file. (10 minutes - no limit)
- Min Rec. Duration - The minimum time for a call to be recorded. (No limit - 30 seconds)
- Loop Rec. - Record over files when memory is full, this is where you Activate or Deactivate Loop Recording.
- Low Memory Reminder - If Loop Recording is disabled, there will be an alert in the top left corner of your LED screen when it’s hit the limit you set. Choose to enable the alert. (5-99 hours)
- Play Announcement - Enable/Disable the option to play a recorded message when an incoming call is answered.
- Off Hook Voltage - The system will record the call automatically when the line voltage is lower than the setting. You can also test the voltage of the line to determine the correct setting from this screen. (15 - 30 Volts)
- Call Out Delay Time - The time the TR600 will record after you finish the call. (0 - 20 seconds)
B. SYSTEM
- Time - Set up the Time of the TR600.
- Date - Set up the Date of the TR600.
- Time Format - Change between 12 hour and 24 hour time format.
- Date Format - Change the way the date is formatted.
- Time Sync. With CID - Synchronize the time with the time stamp from the Caller ID.
- Language - Choose the language of the TR600.
- LCD Contrast - Adjust the contrast of the LCD screen.
- SD Reserved Space - Reserve a space on SD card for Loop Recording.
- Format SD Card - When formatted, the SD card will erase all recorded files.
- Default Setting - Revert all settings back to the default settings.
- Version - This will show the version and SSID serial number of the TR600.
7 Playback
There are two methods to playback your files; you can playback files on the TR600 or remove the SD card & insert it into a computer.
A. PLAYBACK ON TR600 (LOG) : On the main menu, the word LOG is displayed in the lower left corner. Press the Left Select Key to enter the LOG menu. Once in the LOG menu, you will see OPT in the lower left and TYPE in the lower right. These menus are explained below:
1. TYPE : Recordings are categorized & filtered by the following types: All, Incoming, Answered, Unanswered, Outgoing, Note, Flag, Trig,
Answering.
- OPT : Displays options for your recorded files: Play, Flag, Remove Flag, or Delete (you are able to delete the log or the recording), Search By Time, Search By Tel. Number.
NOTE - If you delete the recording & not the log. The log will stay on the TR600 with no recording file. To exit the Log screen press the Back Button.
REMOVE SD CARD
- Unplug the TR600 from power source & remove the AAA batteries. 2. Eject the SD card & insert the SD card into your PC.
- Open the SD card drive when it appears on the desktop.
- Open & listen to your recordings (files are in .WAV format)
NOTE : To power off TR600, the batteries have to be removed. Also, we recommend copying the recordings to your PC before playing them back. Files can be played back on any MAC or Windows computer.
8 Call Assistant
The Call Assistant software is for listening to & organizing your recordings. The software is only compatible with Microsoft Windows (NOT MAC).
A. DOWNLOAD THE SOFTWARE
- Go to the Website https://www.recordergear.com/content/ downloads/tr600.zip
- Download and unzip the zip file.
- Click on and open the Call Assistant RG.exe file. 4. Follow the directions to complete installation
B. USE THE SOFTWARE
There are two methods to use the Call Assistant software: Directly Connect The TR600
- Connect the TR600 to your PC using the Mini USB cable provided. 2. Open the Call Assistant software (installed in the previous step).
Remove SD card
- Power off TR600. Remove the SD card & insert it into your PC.
- Open the Call Assistant software (installed in the previous step).
9 Call Assistant Overview Access Panel
File(F)
- Provides an option to exit the program.
Tools(T)
- Synchronization Device Record - Rescans the TR600 and refreshes the call recordings.
- Fix Device Database - If the database becomes corrupted this option will attempt to repair the database. View Records of Device SD Card - The default setting shows calls on the TR600/SD card.
- View Record of PC Backup - Will show the call files backed up to your PC. Auto Backup Recordings of Device SD Card - When set, this will automatically backup the call files to your PC when the TR600/SD card is connected.
- Set Backup Path - Set the desired location of the backup. Help(H) About, provides contact and version information.
- Call Assistant SD - Opens a window allowing you to browse the Intelligent Recording website.
- All Records - Shows all recordings on the SD card.
- Outbound - Shows outbound calls only.
- Inbound - Shows inbound calls only.
- Notes - Will show Mic mode recordings only.
- Voice Trigger - Will show Voice Trigger calls only.
- Mark Recorders - Will show Marked/Flagged recordings only. Missed Inbound - Will show Missed Calls only.
- Search Records - Will show the results of your search.
- Import Records - Allows you to import other call files if required.
Top Option Bar
- Play - To play a call click on the call in the Call Panel and click the Play icon. Delete - Click on a call and click Delete to delete a call. You can select and delete multiple call files at once by holding down the Shift key on your keyboard to select a range or holding down the Control key on your
keyboard to individually select files. : Search - Define your search by Date, Phone Number and Type of Call. Refresh - Will rescan the TR600 and refresh the display of calls.
- Mark - Flags a call for easier reference.
- Export - Export Excel - Select the range of calls and export the list view to Excel Export Voice.
- File - Export the selected call(s) to a specified location.
- Backup - Backup a call or range of calls to the location set under Tools - “Set Backup Path...”
- Outlook Contact - Read SD card content.
- Send Email - If you use an installed email client on your PC this will allow you to automatically attach the call file in .WAV format to an email.
Player Option Bar:
To load a call file into the Player Panel, double click on the file in the Call Panel.
- Prv - Will play the previous call on the Calls Panel.
- Play - Plays the call file.
- Play Selected - Select an area of the recording by left-clicking and dragging your cursor across the call panel. You can then play that part of the call with this feature.
- Play Marked - Will play a Marked/Flagged file.
- Stop - Stops playback of the call.
- Next - Will play the next call on the Calls Panel.